Saturday 21 April 2012

Part II: A White House Model


Hey All,

In Part II, I will explain the evolution of our project. We, Catherine and I, had suffered many headaches, as I am sure you are all aware of the agony involved in working with Processing and Arduino! In order to explain everything, I will go through my step-by-step process. I organized the steps under three easy categories: the Movie, the Arduino codes, and the Processing language.

The Movie
Initially, from the time our project had commenced, I had grand plans for a specially designed movie for a visual aid. I envisioned a somewhat retro-modern tour that integrated many different presidential terms. For example, I thought it would be great to have a tour from the 1960s and the Kennedy Administration combined with the Obama Administration. This would have showed the stark contrasts over time of different rooms, particularly the Green Room, Red Room, Blue Room and State Dining Room. I had searched different websites, including YouTube. I found a Documentary on the White House from 1962, which featured John F. Kennedy’s wife Jacqueline Kennedy Onassis. The movie was a CBS production that was 58 minutes in length. However, I had run into a few difficulties. First, I did not know how to download the YouTube video and save it as either an .AVI or .M4V file. Second, since the documentary was quite lengthy, how was I going to edit the unnecessary commentary and room tours that were irrelevant for our model? Third, if I were to download the root file, how was I going to edit the .AVI or .M4V? Fourth, how was I going to find a similar documentary with Michele Obama that would correspond with Jackie O’s commentary? Fifth, if I found a similar video how would I integrate the two videos into one file?

As it turned out, these problems, which were seemingly unsolvable, managed to be an easier task. I used the website http://saveyoutube.com/ to convert the YouTube hyperlink into a downloadable .MP4 file. First problem, solved! Then, I was finally able to utilized the capabilities of my overpriced MacBook Pro! I uploaded iMovie, which is a video editing software program. Since I had no prior knowledge with this application, I had thought this was going to be difficult, and it was to a certain extent. However, my second and third problems were solved, or so I thought! The iMovie tutorials although helpful in some areas were not the greatest for integrating two different .M4V files. I had imported both videos into a Project, but selecting the time frames and overlapping excerpts from different clips were not working in the manner that I had wished. Moreover, I spent too much time trying to match clips from Jackie O’s clips with that of Michele Obama’s clips. But more importantly, I had lacked the footage of the actual rooms that we were displaying in our model! So I decided to go back to YouTube and search for videos that were primarily based on the Green Room, Red Room, Blue Room and State Dining Room. 

At this point, I had lucked out. I had watched a specific clip on the Green Room that was posted on YouTube via this website: http://www.whitehousehistory.org. This website proved to be a wonderful source for information. It was sponsored by the White House Historical Association, which had outlined the details of each room that we had put on display in our model. So, with my “expert” knowledge, I downloaded the video files of each room from YouTube, and then used iMovie to integrate the separated .M4V files into one file. 
Now onto the more difficult parts, I had to configure the interface between the iMovie Project and a series of push buttons. Given that we had a few lectures on Arduino and Processing, I had a basic working knowledge (I use those terms loosely) for the language codes necessary to link our model with the newly edited video file of the White House and its rooms.

Arduino & Processing
Arduino was utilized to display a welcome message in our project that directed the viewer to initiate the presentation. This was accomplished by displaying a message that requested the viewer to push down the Democrat figure. The figure was connected to a push button waiting for an input in the Arduino sketch. Upon receiving the input from the button, Arduino was instructed to illuminate the LCD and initiate the playback of the video through Processing. In order to have Arduino interact with an external piece of software on my MacBook Pro, Processing was instructed to run a video that had been encoded using iMovie specifically to the dimensions of the laptop screen. However, we encountered a problem having the Arduino environment interacting with Processing, and initiating the video file. We found it quite difficult to have Arduino interact with Processing and in the end were unsuccessful in having the user interface launch the presentation.

Upon the completion of the Processing language, which enabled our presentation to display the edited video tour, Arduino was coded to display a "Welcome to the White House" and "Please Watch the Video" message and turn OFF the lights that had been illuminated during the presentation. Once the Arduino sequence had completed, the language code was instructed to loop back to displaying the welcome message, which would once again wait for the initiation of the presentation from the next viewer.

Our LCD was formatted to display a message welcoming the user to the presentation and instructing them through the displayed message to initiate the tour via the push button mounted under the Democrat figurine. The button was configured in Arduino to act as an input and through an IF command to initiate the Processing sketch upon a high value being returned from the push button, set as port 8. Our Arduino board had been loaded with Firmata to enable it to interact with Processing.

Our Processing sketch imported the video sequence and the serial import from the Arduino environment, which enabled the interaction of Processing with Arduino and the external video file. We created a variable that searched for an import from the Arduino board, over port 8, which would enable Processing to initiate the playback via the video playback library we installed from http://processing.org/reference/ The Processing environment was voided upon completion of the Video and was instructed to complete the Arduino code.


Essentially, the major problem was linking Processing with Arduino. More specifically, we had the Processing language configured so it would open the .M4V movie file. However, we needed the Processing to talk with the Arduino to have one of push bottons, once initiated, to have Processing receive the input in order to then search out the movie. With that said, this was the ONLY problem (albeit the most crucial part of the project) that held us back from successfully completing the interface! All in all, we had acquired knowledge and utilized software programs, which we would never have thought possible in our basic understanding of computers and language coding.


Tuesday 6 March 2012

March'n onwards...

Hey all,

I am back with some more news and updates on our class project. This past week, Professor Turkel provided us with a couple of great electronic devices! Both sensors, one magnetic and one capacitive, will be placed on our scale model.

capacitive sensor

Working with our magnetic sensor - in the absence of our President, a clear tube, sponge, and magnet will do!

Finally got it to work - but the magnetic attraction is very weak. We will have to look into this more to see whether it is possible to strengthen the charge between the action figure and senor.

Initially, we were going to use only one sensor. However, since we decided to develop an interface, the user will place an object on the scale model. The sensor enables the computer to communicate a message (either a presidential speech or historical information, etc.). Since we have two different types of sensors we can utilize each in a distinct way. First, as previously planned, we will have the user place the president action figure (a magnet will be attached to the bottom) on to the magnetic sensor. Second, we can use a model car to set off the capacitive sensor. Linking the hardware (capacitive and magnetic sensors) to the software (Arduino and Processing) is not as difficult as using the software to convey our historical message. We plan to focus on how to utilize the software tools in our upcoming class.

As promised, this week we purchased the foam core, moss, felt, and wooden doweling! Catherine will post pictures and provide more information on the scale model later today!

Saturday 25 February 2012

February classes, MLG, and a toy President

Hey All,

Reading Week has provided much needed time to work on our project! First things first, over the next few posts, I will be doing a recap over what has been taught to us over the last few classes. This, in turn, will provide a template of skills and tools that can be utilized for our prospective class project.

Last week, our class worked on GoogleSketchUp. I decided, or at least attempted, to sketch a model of the Maple Leaf Gardens in Toronto. The historic building, otherwise known as the "Grand Old Lady" on Church and Carlton Street, was built in 1931. See images below.

Side view (Top) and Front view (Bottom)
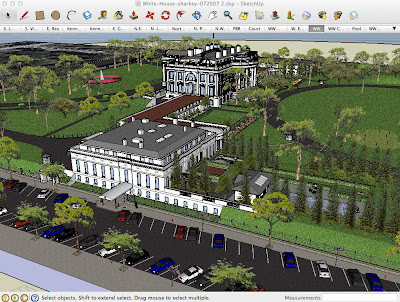
After working on my depiction of MLG - I shifted my focus towards integrating the tools provided by SketchUp for our project. Just as a refresher, Catherine and I are building a model of the White House. The model will contain an interface as a means to communicate historical information pertaining to a specific president of the United States of America. We searched Google for a SketchUp model of the White House. We were lucky - we found a detailed scale model of the White House. See pictures below.
South Lawn
West Wing and South Lawn
North Lawn
This SketchUp model is beneficial in many ways. First, it provides a blueprint on how to create detailed sketches. Second, in terms of our project, it showed a detailed version of the White House for our model that will be constructed using foam core. We expect to use construct a similar model (not as detailed) and place an action figure of a president in a certain spot on the model. See below.
John F. Kennedy Action Figure
When placed on a certain spot on the model, the action figure will trigger the interface via weight sensor. As of right now, we have purchased the foam core and are awaiting the arrival of our President of the United States of America (toy version).

My next post will be focused on using the Arduino. Stay tuned!

Sunday 15 January 2012

The Vintage Goalie Mask

Early January has arrived. Students loathe this time of year. The pleasures enjoyed over the Christmas holidays are gone. School assignments have arrived, and are here to stay. My first assignment is to "brainstorm a 'history appliance'". Keeping with what I know and love, that being hockey, I am planning to invent a "Vintage Goalie Mask". Since the device must be connected to the past, I had envisioned a hockey goalie in the Sixties. My next thought was formulated from the notion of "communication with the dead". Aside from the morbidness, I was intrigued by this potential mode for understanding the past. Also, the combination of hockey and history was unbeatable.

In order to take this concept a step further, I decided to visit a few websites that Dr. Turkel had posted (see: Rube Goldberg) as well as YouTube clips on hockey. A link about the "The Evolution" of goalie masks had sparked interest, but the specific function of my device remained unclear. What information will it provide? Then, I thought of the audience. Who is interested in both hockey and its history? I immediately thought of the Hockey Hall of Fame - a place where millions of fans visit each year to see relics of the past. EUREKA (see Dr. Turkel's step two). Therefore, the device's function is informing fans of distinct eras of goalie masks.